ExelMail Professional E-Mail – Setup MX and DNS Configuration.
ExelMail is a bit different from the “normal” e-mail you get with your hosting account. It does not share anything other than, mainly the MX Records and to access webmail, some parts of the DNS Records.
it is not as complicated as it sounds and we compiled this short article to assist you along the way.
Not surprisingly, there is a couple of steps to be followed to accomplish a successful setup and or transfer of your existing email problem to a completely transparent and scalable e-mail solution.
1. Placing your order.
- Decide exactly what you need before placing your order.
Basic, Enhanced or a Combination (custom) solution - Do you already have a domain name registered?
If you have a website, this is “yes” and you can simply update the relevant MX and DNS records. If not, register a domain of your choice - Do you have access to some form of DNS management for the domain?
If not, transferring your domain to Exelwebs might be an option.
2. Setting up and Managing your ExelMail box
Setting up and managing your mailboxes is as “simple” as clicking a couple of buttons and completing a couple of questions.
Managing the mailbox is as “simple” as clicking a couple of buttons…
View the video, to get a step by step guide on how to Order, Configure, Upgrade and Manage your mailboxes.
E-Mail Migration
At this stage of the configuration, if you are migrating from an existing IMAP based setup, you might consider submitting an e-mail transfer request.
We will need the e-mail addresses you are moving as well as the passwords
3. Configuring your domain MX and DNS records
Since ExelWebs sells cPanel hosting, this article will discuss the process involved with using cPanel.
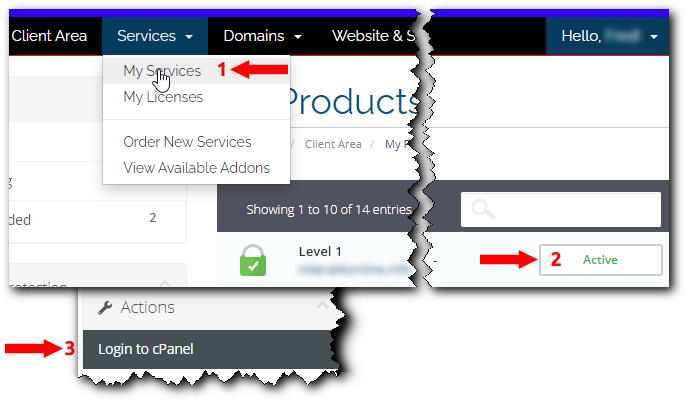
Log into your Exelwebs client area
- Find the “Services” menu option,
- then find the hosting account the domain is hosted on. and click the “Active” button of the hosting account you want to access.
- Click on the “Login to cPanel” option to access your cPanel directly.
If you saved the welcome e-mail we sent you when you first ordered the hosting account, you will find your cPanel username and password in there, you can skip the above steps and go directly to your cPanel
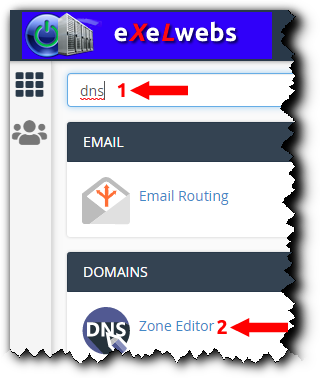
Finding the DNS Zone Editor in cPanel
- In the search bar, type DNS to find the DNS Zone Editor
- Click the “Zone Editor” icon
If you see something like the image below, great, you found the DNS Zone Editor…
This heart of your hosting account and you are now on the verge of becoming a professional in managing your hosting account…
For more details on what everything means and what you can do here, look at the official cPanel Zone Editor documentation
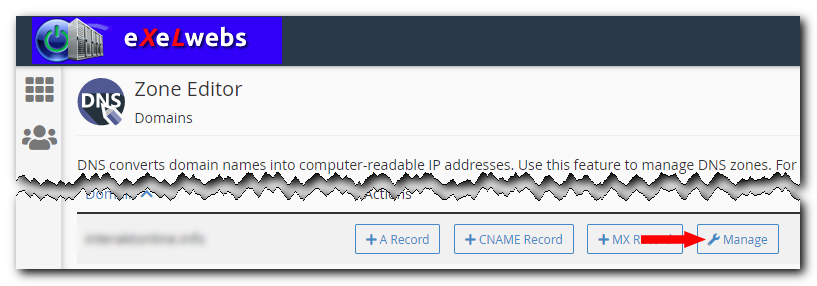
The easiest from here is to click the “Manage” button
Adding and Updating DNS Records
We are going to add 3 different “types” of records.
1. MX records
These are the DNS records that tell the Internet on which servers your mailbox resides. You will need to point them to our servers.
- You should first remove all other MX records by clicking the “Delete” button next to the relevant entries
- Click “+ Add Record” to add the new records one at a time with the values as in the table below.
- Click “Add Record” to save the entry.

| Name | Destination | Priority |
|---|---|---|
| mydomain.com. | mx.emailarray.com | 5 |
| mydomain.com. | mx2.emailarray.com | 10 |
- Obviously “mydomain.com” will be replaced by the actual domain name you are using.
- Ensure 100% accurate spelling of all the entries you are making.
- Note the period “.” directly following the domain name.
That is by design and the Zone editor should add it automatically. Check to make sure anyway...
2. SPF Record
The SPF is a TXT record in the DNS that tells the Internet which servers you allow sending email on behalf of your domain.
You need to add our server name to the list; you can allow multiple servers to send emails for your domain, especially if you use a third party newsletter service.
This is necessary because otherwise, your sent emails will be marked as Spam.
To add a new SPF record, create a TXT record with the value: v=spf1 include:emailarray.com -all
If you have an existing SPF record, you need to edit it and add +include:emailarray.com before the -all tag.

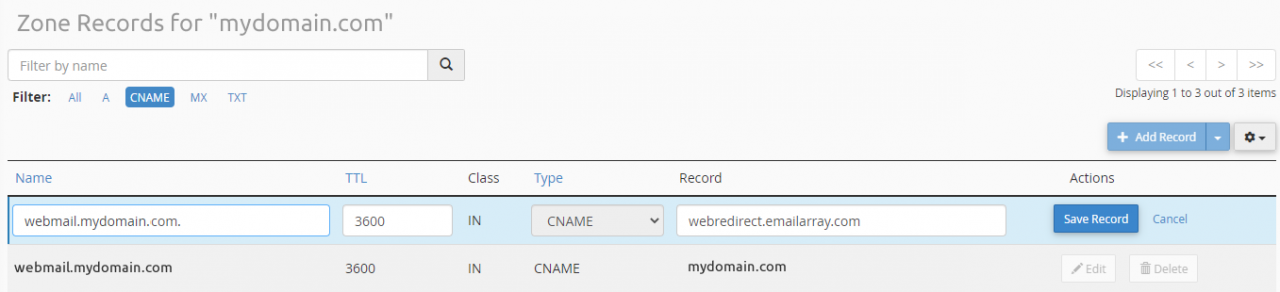
3. Webmail – CNAME Record
A CNAME record that will link the URL webmail.mydomain.com to the Webmail on our servers.
Do this, and you will be able to log in to check your email using this simple URL: webmail.mydomain.com (where mydomain.com is the name of your domain) from any browser (Chrome, Safari, Firefox, etc.), from any device.
Delete any existing records with similar names before you attempt to add your own. The Zone Editor will give you an error if you try to add a second CNAME with the same name.
The value you are going to add will be: webredirect.emailarray.com
What next?
- If this is a new mail-box configuration for this domain, you are done…
All that is needed is to add the email accounts to your favourite desktop and or mobile device e-mail client - Hopefully, you submitted a support ticket to transfer your e-mail as suggested above.
- Wait a couple of minutes for the new DNS changes you made to propagate and you can send your first e-mail
Transferring e-mail to the ExelMail servers
This can be rather tricky and there is always a risk of missing e-mails after the move. Therefore we offer and suggest we do this on your behalf.
- Submit a support ticket with your existing e-mail accounts and the relevant passwords
- We will transfer and verify the emails for you as a free service.
When we are done, you can always change the passwords using the ExelMail User Control Panel or from within the ExelWebs client area, as the administrator.
P.s. Do not forget to update the server settings on your e-mail clients
Information to follow…
You can also directly access our old Webmails: